Project: Basic Profile Creation Project
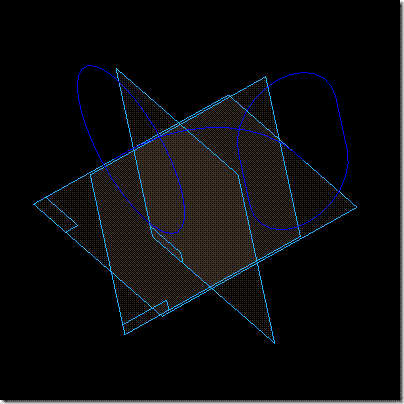
Completion Time: 30 Minutes
Objective: Complete the three sketches to re-enforce the topics described in this unit.
Instructions
1: Create a new metric part in a location where you can save parts. Save the part and name it flanged_elbow.
Step 1 - Details
1.1 Click File | New.
1.2 Select the More tab and select Normet.par from the list.
1.3 Click OK on the New dialog.
1.4 Click File | Save.
1.5 Click OK on the Properties dialog.
1.6 Use the Look In option to navigate to the folder where the part is top be saved.
1.7 Type in flanged_elbow in the file name text box.
1.8 Click OK on the Save As dialog.
2: Create the first sketch Top plane. The profile consists of an arc with two small lines on each side. The arc center is constrained to the mid point of one of the reference planes and the ends of the arc are connected to the corresponding reference plane. The two short lines are both 10mm long. Complete this profile to the shape and size of the following picture. 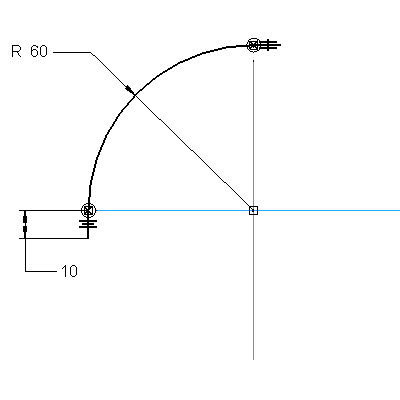
Step 2 - Details
2.1  Click Sketch from the Features toolbar.
2.2 Pick the Top plane in the graphics window.
2.3  Click Line on the Draw toolbar.
2.4 Draw the following curves. 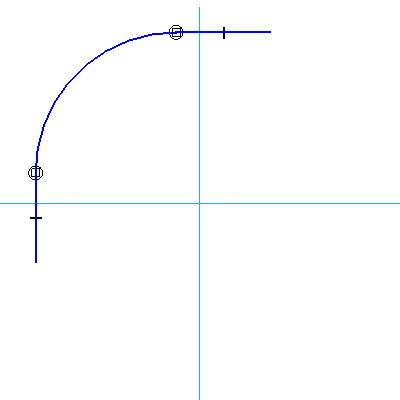
2.5  Click Tangent. Apply tangency between all lines and arcs that do not have it.
2.6  Click Connect. Pick the arc center and the mid point of the reference plane. Pick the endpoint of the lower portion of the arc and select the horizontal reference plane. Pick the endpoint of the upper portion of the arc and select the vertical reference plane.
2.7  Click Equal. Pick the two small lines.
2.8  Click Smart Dimension. Pick the arc and dimension it to a value of 60mm. Pick one of the lines and dimension it to a value of 10mm.
2.9 Click Return on the ribbon bar.
2.10 Click Finish on the ribbon bar.
3: Create the second sketch on the Front plane. The profile consists of a circle. The circle is connected to the end point of one of the short lines in the first sketch. Complete this profile to the shape and size of the following picture. 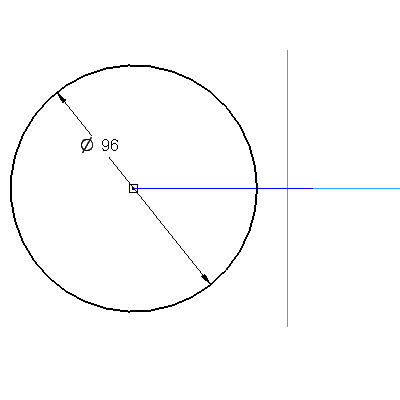
Step 3 - Details
3.1 ![clip_image009[1]](http://lh3.google.com/udhaya1413/R9jPpQ2Fx5I/AAAAAAAABmc/VlgQBZoxkas/clip_image009%5B1%5D_thumb) Click Sketch from the Features toolbar.
Click Sketch from the Features toolbar.
3.2 Pick the Front plane in the graphics window.
3.3 ![clip_image010[1]](http://lh3.google.com/udhaya1413/R9jPqQ2Fx7I/AAAAAAAABms/a7dfazl9Uug/clip_image010%5B1%5D_thumb) Click Circle by Center from the Circle Fly-out on the Draw toolbar.
Click Circle by Center from the Circle Fly-out on the Draw toolbar.
3.4 Draw the following circle. 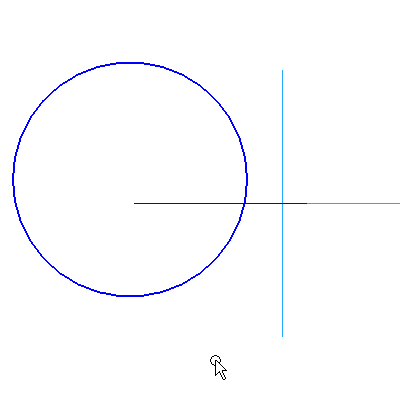
3.5 ![clip_image014[1]](http://lh4.google.com/udhaya1413/R9jPtg2Fx_I/AAAAAAAABnM/S7OFbRLj3Ng/clip_image014%5B1%5D_thumb) Click Connect. Pick the circle center and the end point of the short line from the first sketch. The cursor should look like this when you select the end of the curve.
Click Connect. Pick the circle center and the end point of the short line from the first sketch. The cursor should look like this when you select the end of the curve. 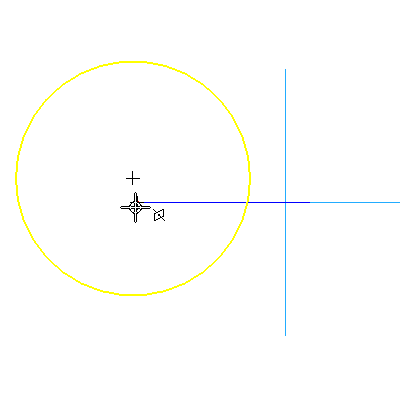
3.6 ![clip_image016[1]](http://lh6.google.com/udhaya1413/R9jPwA2FyDI/AAAAAAAABns/NoLGMbIVmWY/clip_image016%5B1%5D_thumb) Click Smart Dimension. Pick the circle and dimension it to a value of 96mm.
Click Smart Dimension. Pick the circle and dimension it to a value of 96mm.
3.7 Click Return on the ribbon bar.
3.8 Click Finish on the ribbon bar.
![clip_image006[4]](http://lh6.google.com/udhaya1413/R9jPxA2FyFI/AAAAAAAABn8/Y4aA1VBkGcI/clip_image006%5B4%5D_thumb)
4: Create the third sketch on the Right plane. The profile consists of two lines and two arcs in the shape of an oval. The arc centers are aligned vertically with the end point of one of the short lines in the first sketch. The mid points of the lines are aligned horizontally with the mid point of the Top plane. Complete this profile to the shape and size of the following picture. 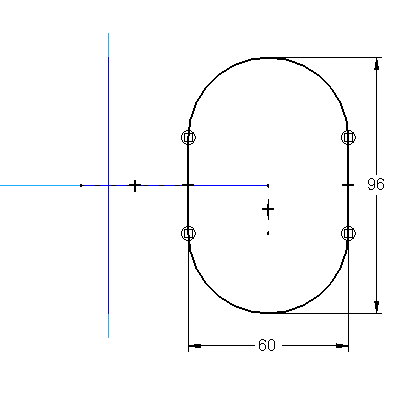
Step 4 - Details
4.1 ![clip_image009[2]](http://lh3.google.com/udhaya1413/R9jPzQ2FyJI/AAAAAAAABoc/80ZD28h6WxU/clip_image009%5B2%5D_thumb) Click Sketch from the Features toolbar.
Click Sketch from the Features toolbar.
4.2 Pick the Right plane in the graphics window.
4.3 ![clip_image010[2]](http://lh4.google.com/udhaya1413/R9jP0g2FyLI/AAAAAAAABos/T3pq3iXRgkA/clip_image010%5B2%5D_thumb) Click Line on the Draw toolbar.
Click Line on the Draw toolbar.
4.4 Draw the following curves. 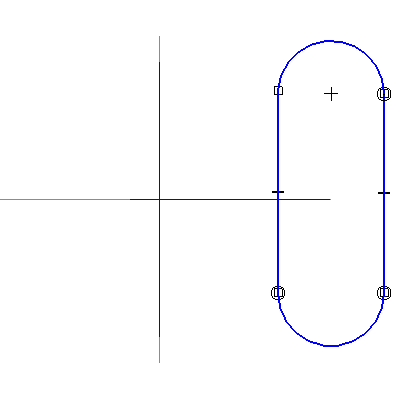
4.5 ![clip_image013[1]](http://lh6.google.com/udhaya1413/R9jP3A2FyPI/AAAAAAAABpM/VjknKtihTsE/clip_image013%5B1%5D_thumb) Click Tangent. Apply tangency between all lines and arcs that do not have it.
Click Tangent. Apply tangency between all lines and arcs that do not have it.
4.6  Click Horizontal – Vertical. Pick the arc center the top arc and pick the end point of the short line in the first sketch. Pick the mid point of the left vertical line and pick the mid point of the reference plane.
4.7 ![clip_image016[2]](http://lh3.google.com/udhaya1413/R9jP5Q2FyTI/AAAAAAAABps/EgKHqJ8dS6E/clip_image016%5B2%5D_thumb) Click Smart Dimension.
Click Smart Dimension.
 Activate Tangent Display in the ribbon bar. Pick the top arc and the bottom arc and dimension it to a value of 96mm. Pick the left vertical line and the right vertical like and dimension it to 60mm.
4.8 Click Return on the ribbon bar.
4.9 Click Finish on the ribbon bar.
5: When you have completed the sketches, save the part. Remember the location of this part for future use.
Step 5 - Details
Click File | Save.
Challenge Task: To ensure the second and third profiles are connected to the first profile, edit a dimension in the first profile. Modify the radius dimension to a value of 120mm. Look to see if the second and third profiles move with the change. If not, revisit the profiles and set the connection to the first profile.
Review: In this project, we positioned the second and third profiles relative to the first profile. If the first profile is modified, the location of the other two will automatically update. This is an effective method for capturing Design Intent.
Click Perpendicular on the Features and Relationships toolbar.