In Continuation to yesterday's post.
Define Plane
The first step in creating a feature is to define the plane. This is the plane that the profile is created on and the zero location of the feature. One option that is available is called Select from Sketch. A Sketch feature is just a profile that is constrained. Use this option when a sketch feature exists in the model. If there are no sketches, this option is not available.

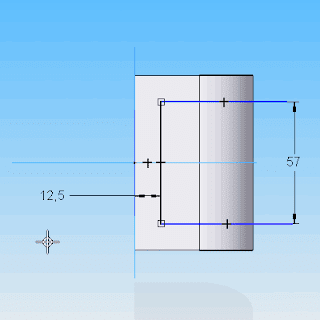
Profile
After the plane is defined, you are placed in profile mode. Here is where you define the outline for the profile. This profile can be an open or closed profile. If you are creating the first feature in the part, then the profile has to be a closed profile.

Side Step
If your profile is open the next step in the feature process is to define the side step. The side step is a direction arrow that originates from the profile. The arrow point to the side that material is to be created for the feature. If your profile is closed, this option is unavailable and is skipped.

Extents
When a feature is created, the feature starts at the profile, and can end on either side of the profile. By activating the Symmetric Extents icon, the feature is now created equally on both sides of the profile. For example, if a distance of 30 millimeters is specified for the overall distance, the feature would extend 15 millimeters on each side of the profile. The Non-Symmetric Extents icon creates the feature with a different start distance and end distance. For example, you could start the feature at 3 millimeters and end it at 20 millimeters from the profile.
The Extents Step defines the distance for the feature. For features like Protrusions and Cutouts, the extent options define a linear direction. For features like Revolved Protrusions and Revolved Cutouts, the extent options define an angular orientation. These options will be reviewed in the upcoming topics.
The Extents Step defines the distance for the feature. For features like Protrusions and Cutouts, the extent options define a linear direction. For features like Revolved Protrusions and Revolved Cutouts, the extent options define an angular orientation. These options will be reviewed in the upcoming topics.

Treatment Options
Some features have the capability of creating treatments. In Solid Edge, treatments come in the form of Drafts and Crowns. The Draft Treatment is a handy option for creating plastic parts or castings. It saves you from having to apply a secondary Draft feature to the model. The Crown Treatment is similar to the Draft Treatment except for the treatment is rounded, where draft is flat.

Feature Creation Process Video
hi, u r given very clear steps in all u r post. Can u post tips other than sold edge, like solid works & catia
ReplyDeletethnx
ReplyDelete